AB Overlays
Nine overlays that sit on top of iRacing while you drive: your inputs, a proximity spotter, a live track map, a G-force pad built from your own grip, a lap log, conditions, a relative, the standings and a fuel calculator. They are all off by default. This page covers how to switch them on, how to arrange them the way you want, and — one section each — what every overlay shows, how to read it, and where it deliberately stays silent rather than guess.
1. The basics
An overlay is a small always-on-top window that AB Racing Line draws over iRacing. They read the same live telemetry the sim publishes, so there is nothing to install in iRacing itself and no file to configure — start the app, start driving, and the overlays you have enabled appear.
They follow iRacing on their own. When live telemetry starts arriving they show; a few seconds after it stops — you closed the sim, or left the session — they hide again. You do not have to remember to turn them off, and they will not sit on your desktop between races.
Everything on every overlay is measured from your own car in the session you are driving. Where a number cannot honestly be produced yet, the overlays show a dash or say what they are waiting for — they do not fill the gap with an estimate that looks like a fact.
2. Turning overlays on
Open the AB Overlays tab in the app. Every overlay has a card showing what it looks like and a one-line description. Click a card to turn that overlay on; click it again to turn it off. The setting sticks, so the ones you use come back every time you launch the app.
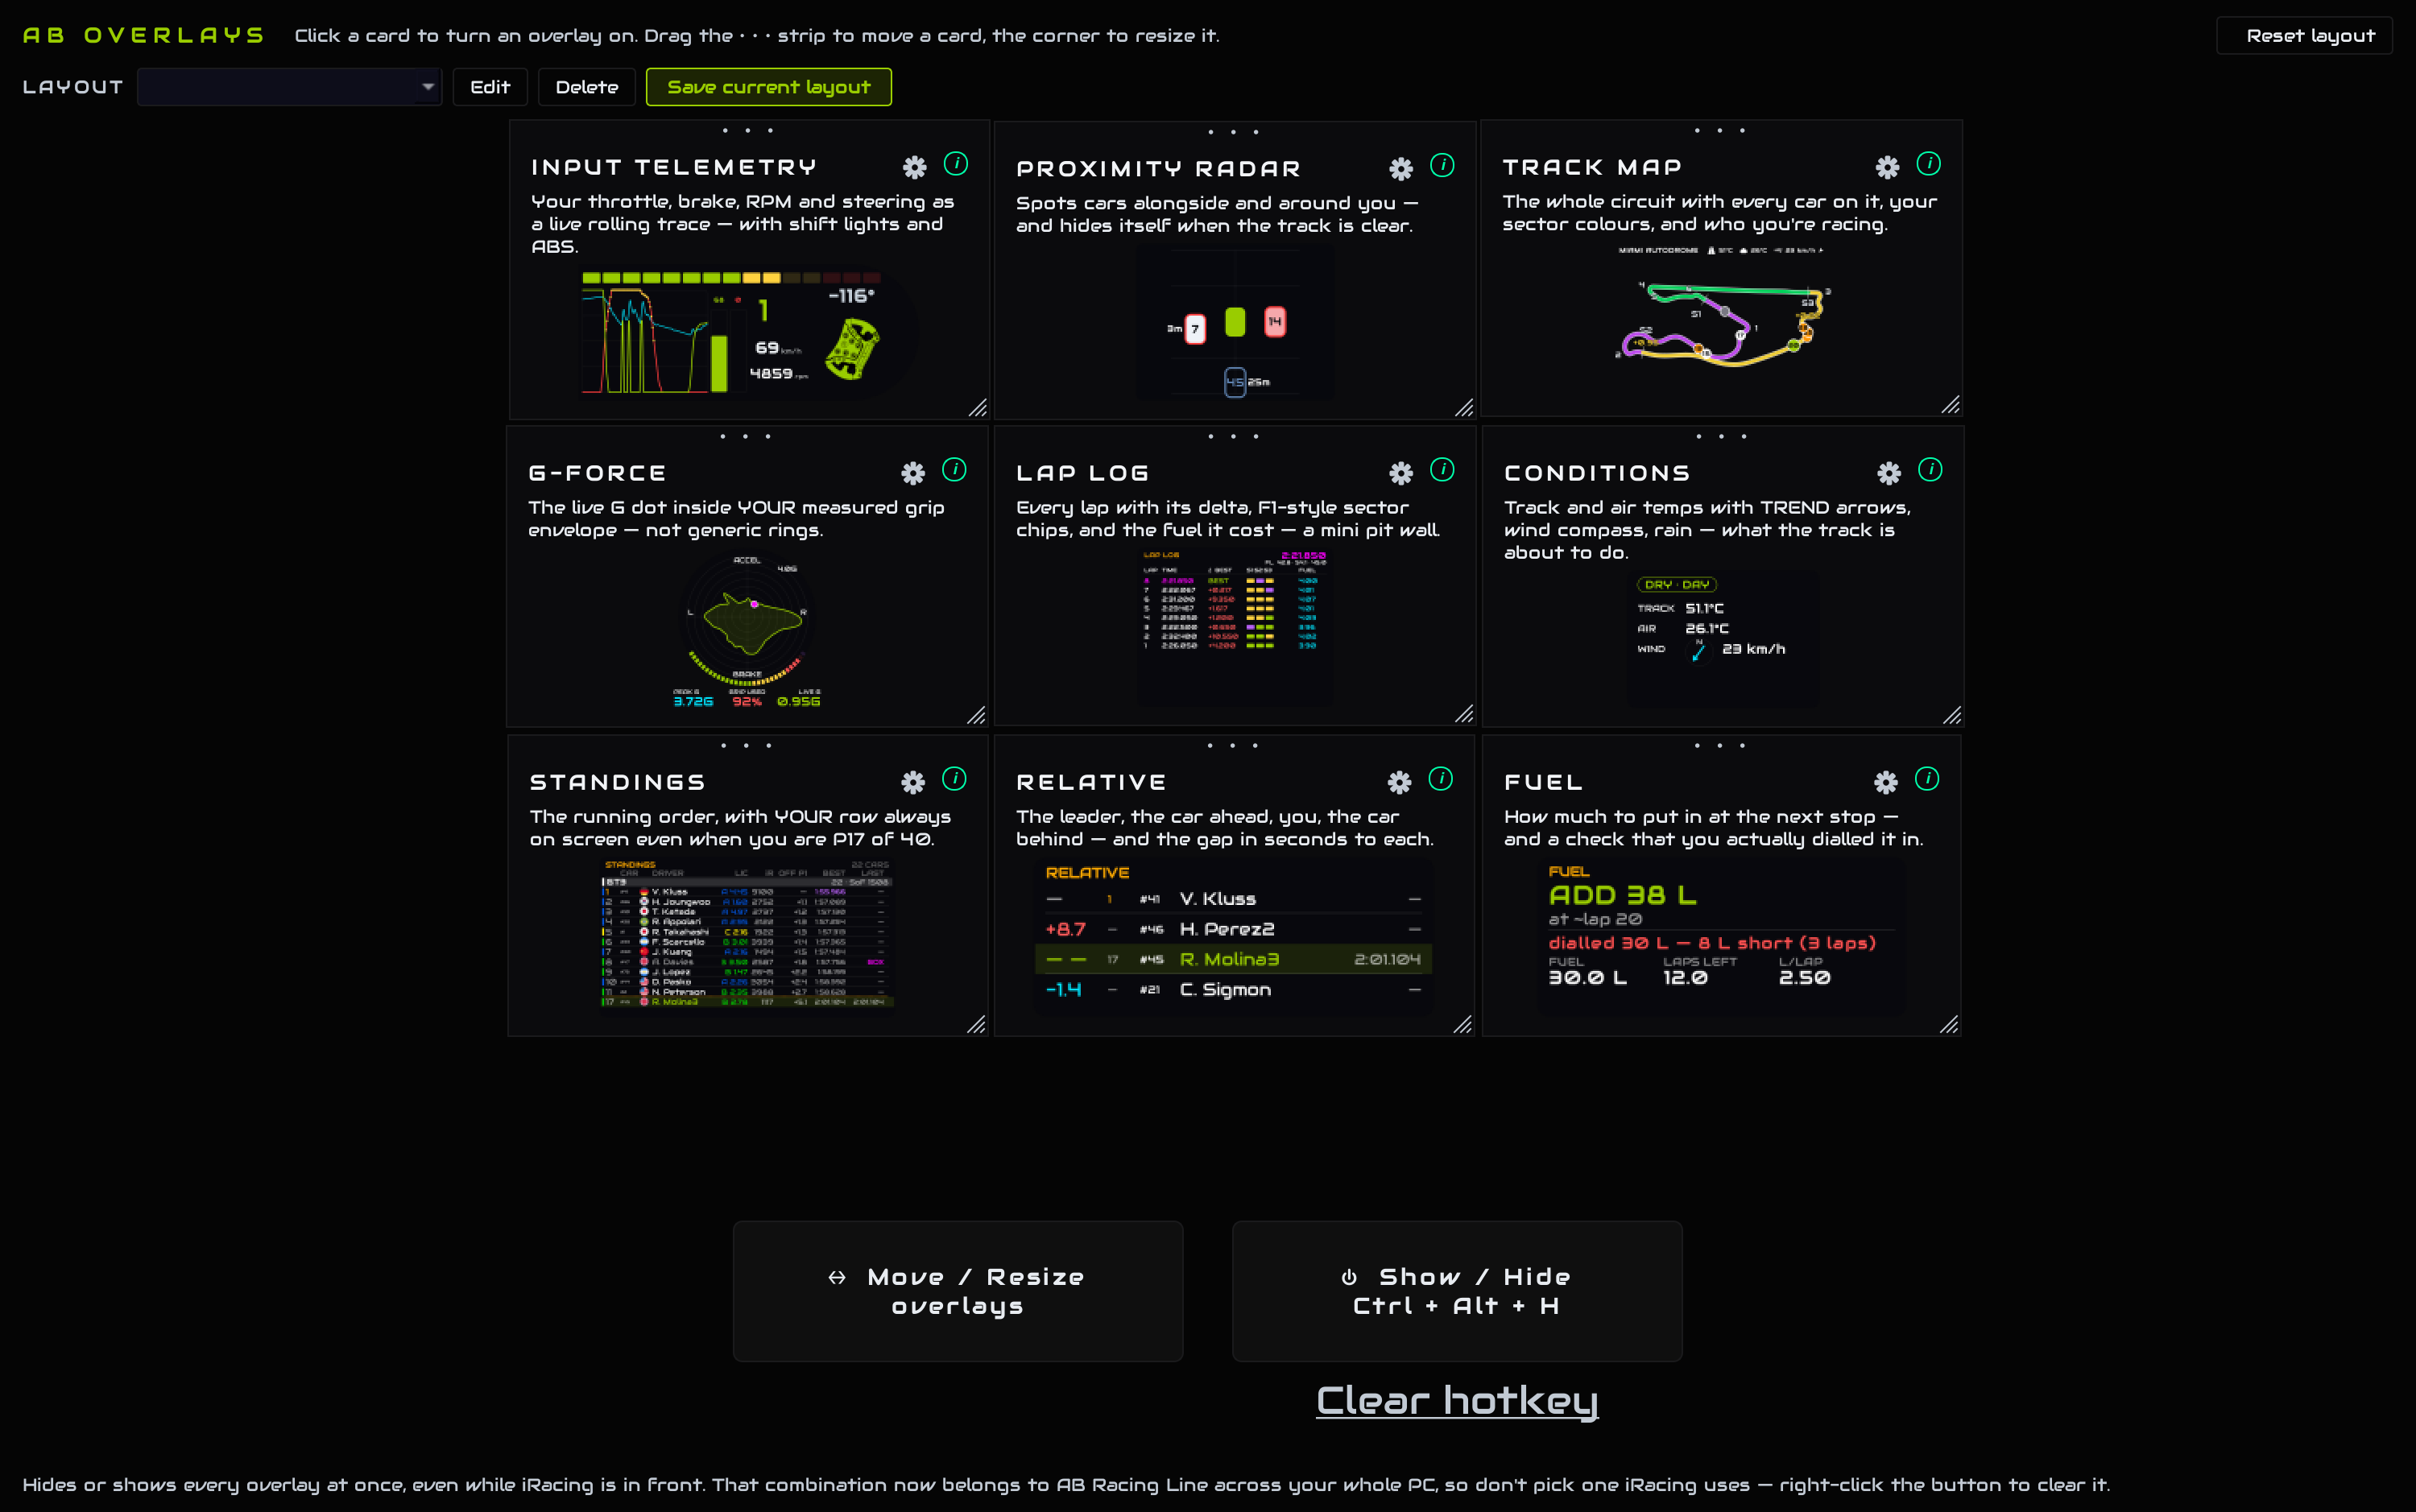
The AB Overlays tab — nine cards, the layout controls above, and the show/hide hotkey below
Two small buttons sit on each card. The ⓘ opens a full explanation of that overlay without leaving the app — the same detail as the sections below. The cog is for streaming, and is covered further down.
3. Moving and resizing
While you are driving, overlays are locked: clicks pass straight through them to iRacing, so an overlay sitting over your mirror can never steal a click. That also means you cannot drag one until you say so.
Press Move / Resize overlays on the AB Overlays tab. Every enabled overlay gets a visible outline and becomes draggable:
- Drag anywhere on the overlay to move it — not a title bar, the whole panel.
- Drag the bottom-right corner to resize. Overlays scale their contents, so a bigger overlay means bigger text, not more empty space.
Press the button again when you are happy. Positions and sizes are saved as you go, so they are exactly where you left them next time. Reset layout puts everything back to where it started if you lose an overlay off the edge of a screen.
4. Saved layouts
A layout that works in a GT3 can bury the mirrors in a prototype, and a triple-screen arrangement is wrong on a single screen. So you can save an arrangement by name and switch between them.
- Arrange the overlays how you want, then press Save current layout and give it a name.
- Pick it from the LAYOUT dropdown any time to put everything back.
- Edit loads a layout and unlocks the overlays so you can adjust it — changes write back to that layout as you make them.
- Delete removes one you no longer want.
A layout stores positions and sizes only. Which overlays are switched on is a single global setting, deliberately — switching layout mid-weekend should never silently turn an overlay on or off behind your back.
5. The show / hide hotkey
Sometimes you want the screen clean — a replay, a screenshot, a passenger watching. Set a keyboard shortcut that hides and shows every overlay at once, and it works while iRacing is the active window, which is the entire point.
Click the Show / Hide button on the AB Overlays tab and press the combination you want. To clear it, use the Clear hotkey link under the button, right-click the button, or select it and press Delete.
- It must be a combination — Ctrl, Alt or Shift plus a key. A bare letter would be taken from every other program on your PC, so it is refused.
- Do not pick something iRacing uses. Once registered, that combination belongs to AB Racing Line across the whole machine.
- If another program already owns it, the app tells you it is in use rather than quietly doing nothing.
- Keyboard only. A wheel or button-box button cannot be used — Windows does not expose those as system-wide shortcuts.
6. Input Telemetry
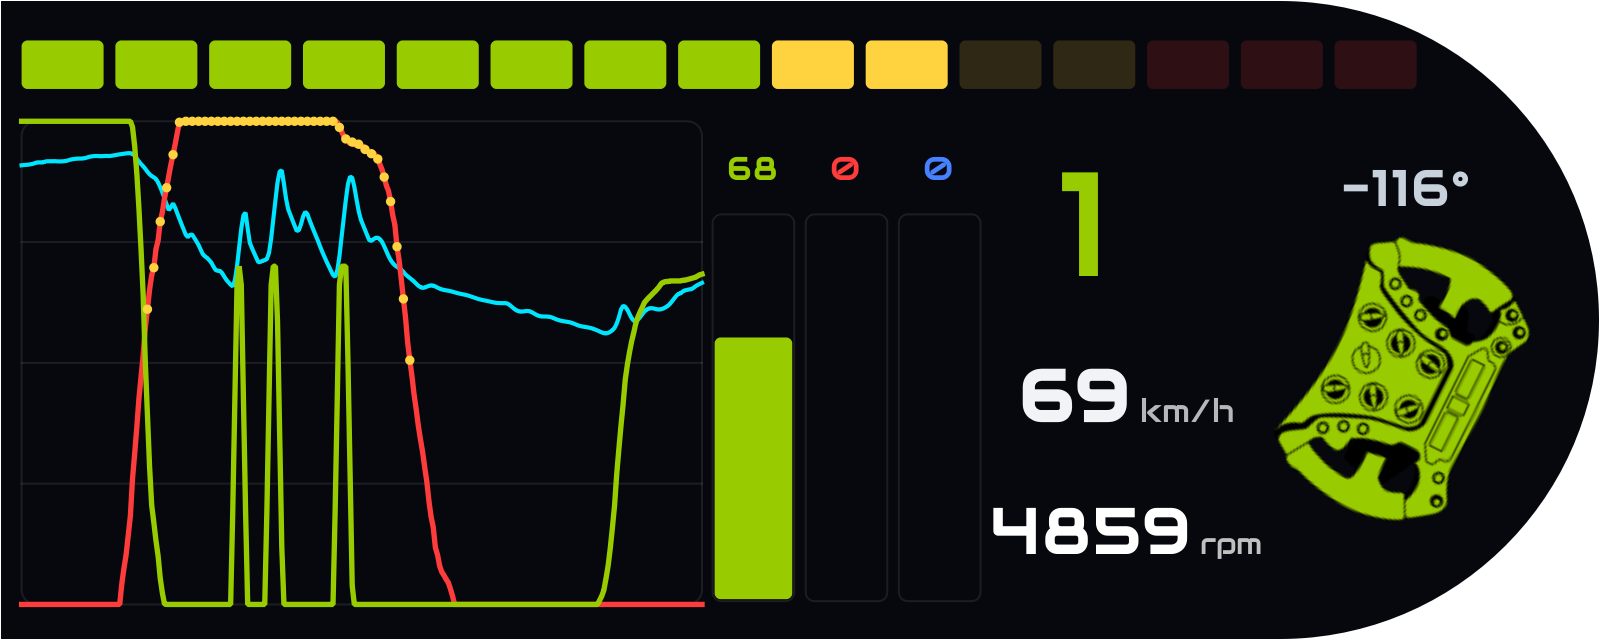
Throttle, brake and RPM as rolling traces, with pedal bars, shift lights, gear, speed and steering
A live dash strip showing exactly what your hands and feet are doing.
- Rolling traces — throttle (green), brake (red) and RPM (cyan). The left axis is throttle and brake as a percentage, the right axis is RPM up to your car's redline.
- ABS shows in yellow, drawn on the brake trace, and it is deliberately broken into segments — ABS pulses on and off, so a solid line would be a lie about what the car did.
- Pedal bars for throttle, brake and clutch, with the live percentage above each.
- Shift lights run across the top and flash when you reach the car's own published shift point — and flash all-cyan whenever the pit limiter is engaged, so you cannot miss it.
- The wheel turns with your real steering angle, with the angle in degrees beside it, and gear, speed and RPM alongside.
Speed follows your Display Units setting. You can also rearrange the individual elements: in Move / Resize mode, open the cog on the Input Telemetry card and choose Arrange items — then drag or resize any single piece, or nudge it with the arrow keys. Reset items puts them back.
7. Proximity Radar
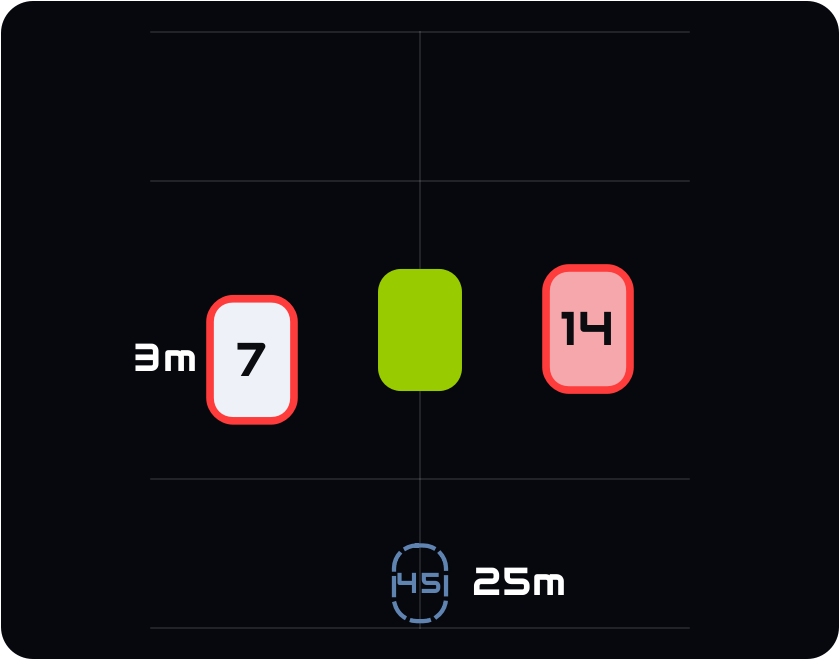
You in green; cars 7 and 14 in their lanes; car 45 dashed on the centreline because its side is not known yet
A top-down spotter for the cars you cannot see.
- Nearby cars are placed by their real gap to you along the track — about 30 metres either side on a road course — class-coloured and numbered. You are the green car in the middle.
- On ovals the reach is measured in time, not metres, so it stretches with speed. At Daytona you need warning of a car that is still a second away; at Martinsville you don't. Any fixed distance would be wrong at one of them.
- Left and right come straight from iRacing's own spotter, the same signal that calls "car left" in the sim. When someone is genuinely alongside, that side flashes red with CAR LEFT, CAR RIGHT or 3 WIDE.
- It hides itself when nobody is near, so it never sits in your eyeline on an empty track, and reappears the instant a car closes in.
8. Track Map
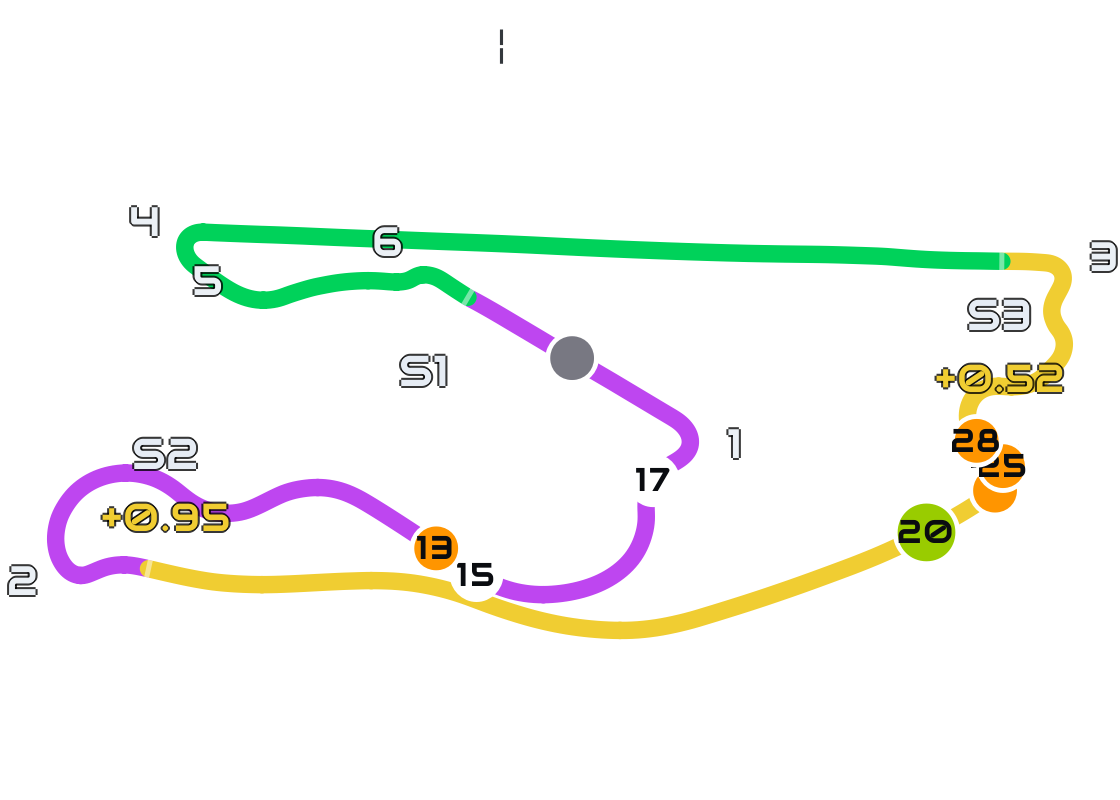
Sector colours, corner numbers, live cars, and how far off the session best each sector is
A live map of the lap. It draws the circuit from your own driving, so it works at any track with no setup and nothing to download — it says “Building track map…” until you have completed one lap, then remembers that track for next time.
- Every car on track, class-coloured and numbered, with you highlighted in green and moving smoothly between updates.
- Each sector is coloured by how you are doing there: purple when you hold the fastest sector of the session, green when your last time there was your personal best, yellow when it was not. A small figure shows how far off the session-fastest your best is.
- Cars you are battling — within about a second — get a pulsing ring and their gap in seconds, plus an arrow showing whether they are closing on you (red) or you are catching them (green).
- Cars that run off track are flagged, and the ring flashes so you can see who it is.
- Corner numbers, sector lines, and a header with the track name, track and air temperature and the wind.
9. G-Force
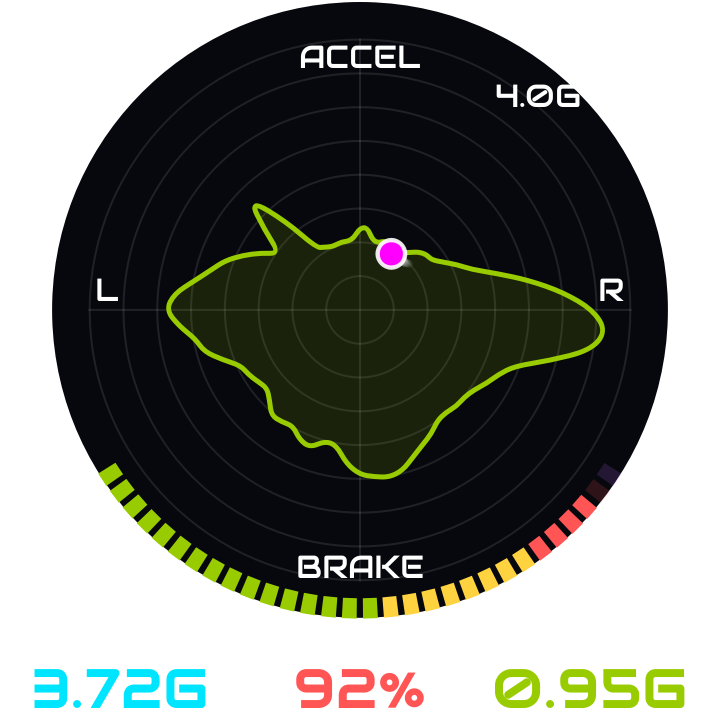
The live dot inside your own measured envelope — braking down, acceleration up, cornering to the sides
A friction-circle pad that knows what you have actually done.
- The green shape is your grip envelope, measured live. It starts empty and grows outward as you genuinely use grip, one direction at a time. It is never a theoretical circle — everything on this pad you have proven yourself.
- The dot is your car right now, with a comet tail so you can see the transition through a corner: braking at the bottom, acceleration at the top, left and right cornering on the sides — the same layout as the friction circle on the Overview tab.
- The headline number is how much of your own proven grip you are using in the direction you are loaded right now. It stays at “--” until enough driving has been recorded to make that claim honestly, and turns pink when you are right at your edge.
- It resets when a new session starts — a fresh track deserves a fresh envelope.
The useful habit is watching the shape fill in. A pad that is wide but shallow at the bottom says you corner hard but have not really leaned on the brakes; a notch on one side says there is a direction you are not committing to.
10. Lap Log
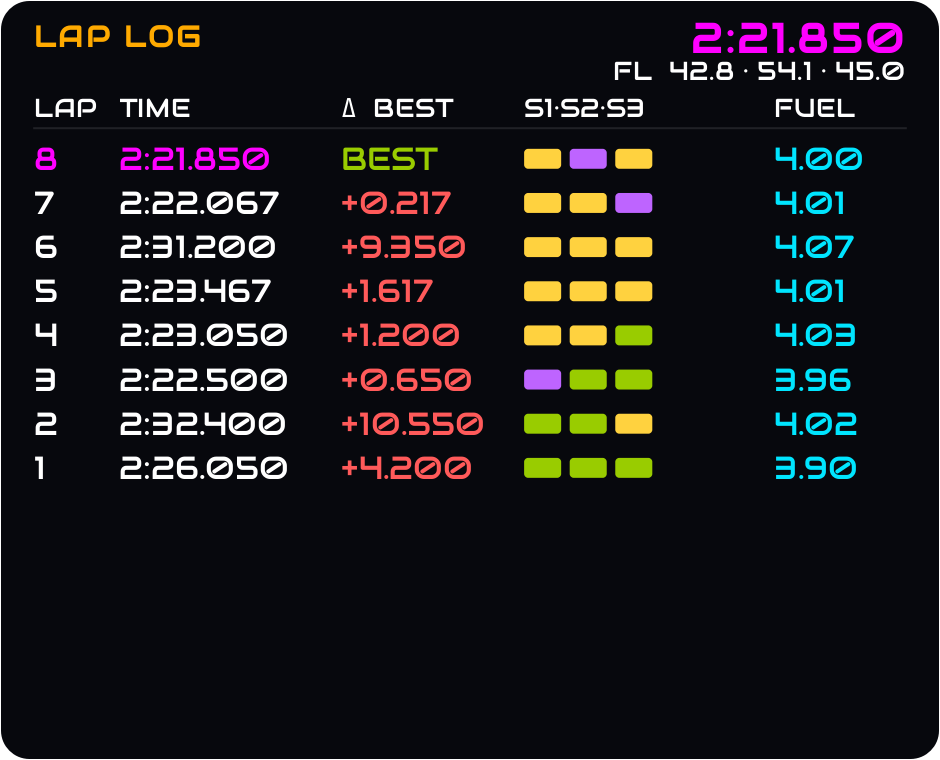
Every lap with its delta, three sector chips, and the fuel that lap actually cost
A pit-wall lap history rather than just a list of times.
- Each completed lap with its time and the gap to your session best — the best row simply says BEST.
- Three sector chips per lap, coloured the F1 way: purple when you hold the session-fastest sector, green for a personal best, yellow when you were off it. Same timing as the Track Map overlay, so the two always agree.
- The fuel that lap burned, measured from the tank at each start/finish crossing — the number your stint planning actually runs on.
- Laps that cannot honestly be reported show a dash: a lap containing a pit stop (the tank went up, so the burn is meaningless), and laps with no valid time such as out-laps. This log never invents a number.
11. Conditions
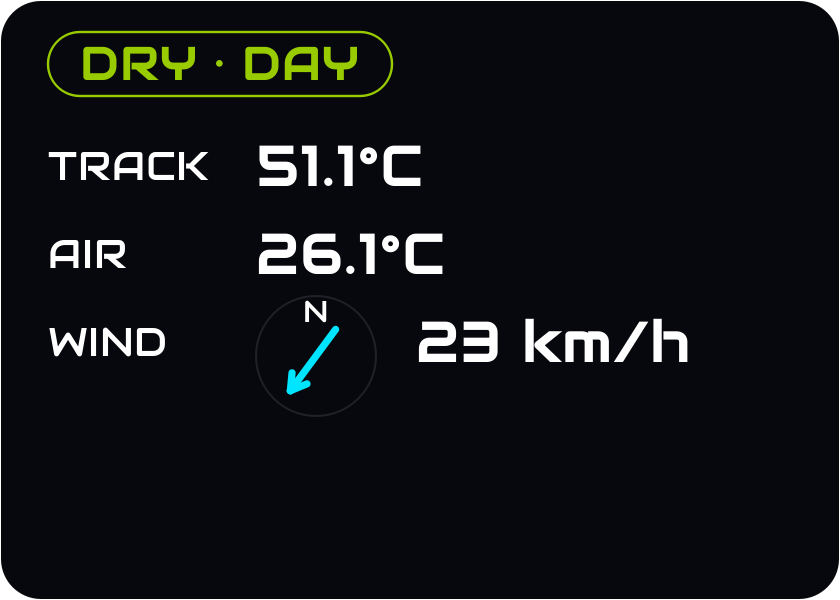
Track and air temperature with trend arrows, the wind, and the current track state
The conditions panel for races long enough that the weather changes.
- Track and air temperature with a trend arrow when they are genuinely moving — amber rising, cyan falling, measured over the last few minutes. A cooling track means grip and tyre pressures are about to change, and that arrow is the early warning.
- A wind compass with the arrow showing where the wind is blowing to, plus the speed. Headwind versus tailwind changes your braking point at the end of a long straight more than most drivers expect.
- Track state and time of day — dry, damp, wet, and day, twilight or night.
Nothing here is a forecast. It reports what the conditions are doing now and which way they are trending, both measured.
12. Relative
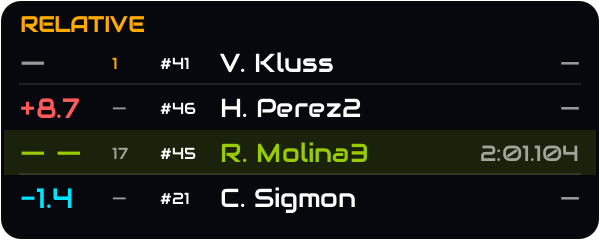
Leader, the car ahead, you, the car behind — the cars you are actually about to deal with
Who is about to be on top of you, and how long you have.
- Four rows: the leader, the car ahead of you on track, you, and the car behind. Not the running order — the cars you are actually about to deal with. A car two laps down sitting right behind you matters more to your next corner than whoever is running second.
- The gap in seconds to each, red for a car ahead and cyan for one behind, so a closing rate is something you glance at rather than work out.
- Cars in the pits are dimmed and marked PIT, so you know the one behind you is about to lose time rather than attack.
13. Standings
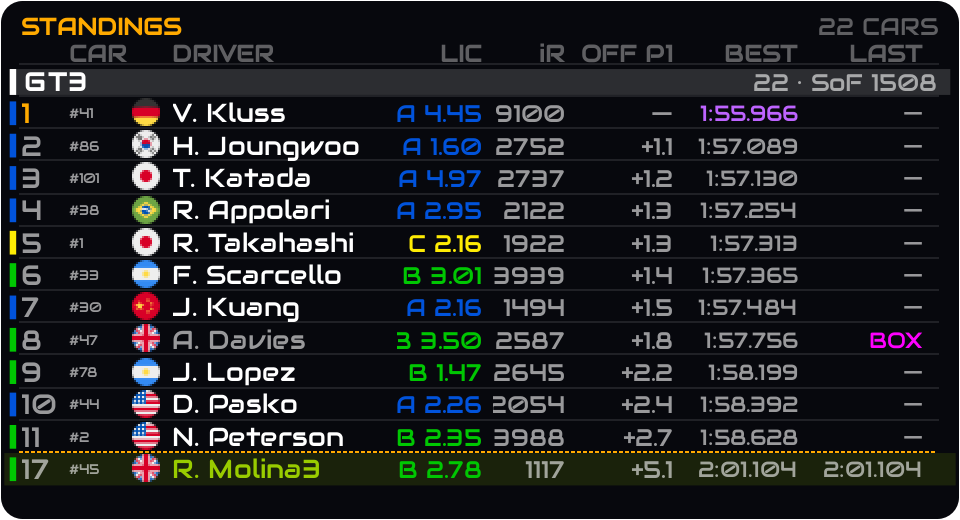
The running order, grouped by class, with your own row always on screen
The classification, sized for a cockpit rather than a second monitor.
- Every classified car from P1 down, with the gap to the leader and each driver's last lap and best lap.
- Your row is always drawn. In a real field you would fall off the bottom of a small overlay and end up reading a list you are not in — so when that happens your row becomes the last one, behind a dotted line showing the order jumps.
- Grouped by class in multiclass racing, with each class's car count and strength of field, and positions numbered within the class. A GT3 running P14 overall should not have to work out that it is P3 in class.
- Car numbers are coloured by class, using iRacing's own class colour when it publishes one — the same colours as the radar and track map, so a class looks the same on every overlay.
- Drivers in the pits are dimmed and marked PIT; a driver stopped in their box is marked differently from one still rolling down the pit lane.
14. Fuel
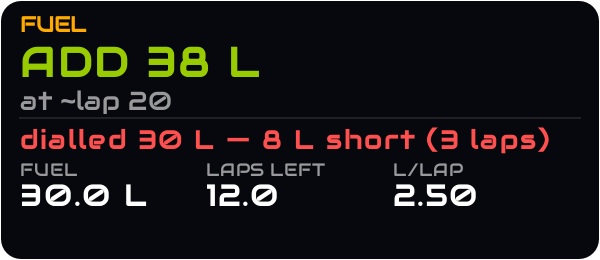
What to dial in at the next stop — and a check that you actually dialled it
The number you type into the pit menu, and the one thing no other fuel calculator does.
- ADD x litres — what to take at the next stop, which is not the same as the total fuel still needed to reach the flag. With two stops to come, that total is wrong twice over. With one stop left it takes only what reaches the flag, so you are not carrying a full tank to the end for nothing.
- It reads the pit menu back. iRacing broadcasts how much fuel you have dialled in, so the overlay compares it with what you need — “dialled 45 L — 7 L short (3 laps)”. That catches the mistake on the lap before the stop, which is the only moment it can still be fixed.
- It says MEASURING n/3 LAPS until your burn rate is steady. A call built on one lap moves every lap, and an out-lap burns nothing like a racing lap.
- In practice, where there is no real race clock, it shows laps of fuel rather than anything flag-related.
Litres follow your Display Units setting, and the shortfall is also given in laps, which needs no unit at all.
15. What needs a few laps first
Several overlays are measured from your own driving, so they have nothing to show the moment you roll out of the garage. That is by design — the alternative is a made-up starting value. What each one is waiting for:
- Track Map — one complete lap, to draw the circuit. It says “Building track map…” until then, and remembers each track afterwards.
- G-Force — enough driving to have a grip envelope worth comparing against. The headline reads “--” until then.
- Fuel — three racing laps, shown as MEASURING n/3.
- Lap Log and sector colours — a completed lap, and a completed sector.
- Relative gaps in seconds — one lap time, to convert distance into time.
16. Honest limits
Things the overlays deliberately do not do, and why — so a silence is never mistaken for a fault:
- No traction-control indicator. iRacing publishes an ABS activation signal but no equivalent for traction control — only the dial setting. So ABS is shown and TC is not, rather than a light that is really a guess.
- Left and right only when the sim knows. Covered under the radar above: beyond a few metres, no lateral position exists to read.
- Sector colours are yours versus the session, not iRacing's black box. The overlays compare your best in each sector against the fastest anyone has managed in this session. iRacing's own display answers a different question, so the two will not always agree — neither is wrong.
- Exclusive fullscreen is not supported, by anything. Use borderless.
- Nothing is predicted. Every figure describes what has already happened in the session you are driving.
17. Streaming overlays to OBS
If you stream, you have probably hit this: an overlay lives at a position on your desktop, so to get one inside a vertical crop you have to drag it into the middle of the screen — which is also the middle of your driving view — and that same arrangement looks wrong in a full-screen horizontal layout. One desktop position cannot serve two output framings.
So instead of OBS having to find an overlay on your screen, OBS can fetch it. Each overlay can be served to OBS as a Browser Source, positioned per scene, entirely independently of where it sits on your monitor.
On the AB Overlays tab, click the cog on the overlay you want:
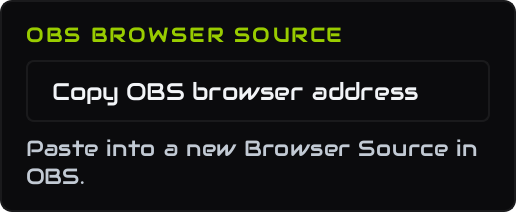
The cog panel — one button
Click Copy OBS browser address. The address goes to your clipboard and the panel shows it back, along with the size that overlay is designed at:
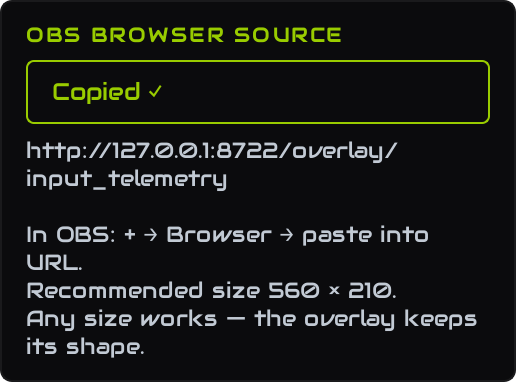
After copying — the address, and the size to start from
Then in OBS:
- + → Browser
- Paste the address into URL
- Set the width and height (the panel recommends the overlay's natural size)
- Position it in the scene — and repeat per scene, vertical and horizontal, each with its own placement
A few things worth knowing:
- Your on-screen overlays are untouched. Streaming builds its own copy, so an overlay can be on your monitor and in your stream at the same time, at different sizes.
- Resizing in OBS does not disturb your driving layout. Whatever size the Browser Source asks for applies only to the streamed copy.
- It only serves your own PC. The address is a local one — it is not reachable from the internet and nothing is uploaded.
- Leave the app running. The overlays are drawn by AB Racing Line, so your sources go blank if you close it — but you do not need the on-screen overlays switched on. Turning them off and streaming through OBS instead works fine.
Questions?
The rest of the app is covered in the main user guide, with deeper pages on Race Strategy and the Live Pit Wall. If an overlay does not look right with your data, use the feedback button in the app — real sessions are how these get better, and several of the behaviours described above exist because a driver reported something that looked wrong.